The Grade Center can be used to manage and record student grades throughout the semester. The columns shown in the Full Grade Center are composed of User, Calculated, and Graded columns.
Note: While the Grade Center can be used to record grades and calculate final grades, these are not the official grade of record. Instructors will still need to record their final grades in Self Service
By default the Grade Center in your Blackboard course comes with a total column that sums up the points of all other graded columns in your grade center, but did you know it's possible to create your own customized total column that only includes the columns you wish to sum? Possible uses for this column could be to quickly add up the total points of the individual discussion board grades, or to add extra credit columns to existing assessment scores.

Weighted total columns are similar to total columns in that they are used to sum graded columns together, but while the total columns treat every point equally, weighted total columns go the extra mile and allow you to assign a percentage value each graded column is worth towards the sum. In other words, you can use weighted total columns to create a grade that reflects the grading breakdown you should have listed in your syllabus.
By default, every course comes with an empty weighted total column in the Grade Center, so the only thing you need to do is edit the existing weighted total and add the graded columns / categories so they reflect your syllabus schema.

If you have a heavy grading workload, the Needs Grading page can help you determine what needs attention first. You can view all items ready for grading or review.
For courses with many enrolled students and gradable items, you can use the Needs Grading page to organize your grading workload. You can review and grade these gradable items:
You can customize the view of items with a Needs Grading status. You can sort, filter, hide, and grade the most urgent items first. For example, you can sort by due date to ensure you grade your final tests by the Registrar's deadline at the end of a term.
When you allow multiple attempts, you may not need to grade some of the attempts. You can hide the attempts that don't need grading to further organize your grading workload.
If students submitted work after the due date, the items appear with a Late label in the Date Submitted column.
Access Needs Grading
Learn more about grading multiple attempts, or displaying attempts in the Needs Grading page
We recommend that you assign an override grade from the Manual Override tab on the Grade Details page. You can add feedback for the user and notes for yourself about the grade change. You will have a record of why you chose to override any future attempts.

The only way to assign on override grade for gradable journal and blog entries, wiki page saves, and discussion posts is on the Manual Override tab. However, you can edit an override grade from an interactive tool's grading panel and disallow its precedence.
You can use the Revert function to clear an override grade and display the previously assigned grade, if one exists. Otherwise, the Needs Grading icon appears.

You can create an extra credit column in the Grade Center with a maximum score of 0 that is included in the default Total column computation. Then, you can assign extra credit points as needed.
This method works for only one individual extra credit column where grades aren't weighted.
The extra credit column appears in the Grade Center. After you add points in an extra credit column, a student's total points can equal more than 100 percent. If a student receives full credit for all gradable items (100 points) and also receives 6 extra credit points, the result is 106 out or 100 or 106%.

On the Grade Details page, you can view a student's attempts and grade history, assign and edit a grade, and clear and exempt grades.
On the Attempts and Grade History tabs, you can view the rubric used for grading.
In the rubric's List View, if you didn't select an option for a criterion and then typed feedback, the feedback wasn't saved when you saved the rubric.
This page also serves as the main location for users with assistive technology such as screen readers. All of the information associated with an item appears on the Grade Details page.
At the top of the Grade Details page, the Current Grade section displays the current score or an icon such as Needs Grading.

If you select Exempt, this grade is excluded from a student's Grade Center calculations. The Exempt icon appears in the cell in the grid.
Select View Attempts to access all the attempts associated with this item.
The Attempts tab lists all submitted attempts. You can view each attempt's submission date, feedback, and grading notes to yourself.
For each attempt, you can grade, clear, or edit the grade. You can also ignore an attempt to keep it but omit the score from Grade Center calculations. The attempt isn't counted toward the number of allowed attempts.
Use the Delete menu to select one or all attempts to delete.
If a student submits the maximum number of attempts, Allow Additional Attempt appears so that you can permit another submission.
On the Manual Override tab, you can assign a new grade for an item. Type a new grade in the Override Grade box. You can also provide Feedback to User and Grading Notes, and attach files in the editor.
The Column Details tab presents information about a Grade Center column such as name, description, primary display, and average score.
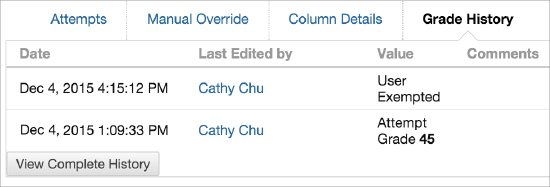
On the Grade History tab, the two most recent actions appear by default. Select View Complete History to see more.
On the Attempts and Grade History tabs, you can view the rubric used for grading. In the rubric's List View, if you didn't select an option for a criterion and then typed feedback, the feedback wasn't saved when you saved the rubric.