Skip to Main Content
MCPHS Library Logo

Center for Teaching & Learning: Zoom Web Conferencing

Supporting the MCPHS faculty and staff in their commitment to excellence and innovation in teaching and learning

New Features & Guides

Zoom Cloud Video Expiration and Kaltura Backup

As of September 1, 2021, videos recorded to the Zoom cloud will be automatically removed after 6 months. However, recordings to the Zoom Cloud are automatically backed up to Kaltura, the university's cloud video storage solution, and you will be able to access your videos there. To review your Kaltura Media Gallery to ensure recordings have been transferred, you may either use Blackboard or open a web browser:

  • In Blackboard, select Tools from the Base Navigation (left panel), and then select My Kaltura Media
  • In your web browser, go to the Kaltura web portal at media.mcphs.edu, log in with your MCPHS credentials, and then select My Media

To use your Kaltura media within your Blackboard course, please visit the Kaltura tools page for additional guidance.

Zoom Meetings

System Requirements

System requirements

  • An internet connection – broadband wired or wireless (3G or 4G/LTE)
  • Speakers and a microphone – built-in or USB plug-in or wireless Bluetooth
  • A webcam or HD webcam - built-in or USB plug-in
  • Or, a HD cam or HD camcorder with video capture card

Download Guides

Student Resources

How to Join a Scheduled Course Meeting as a Student

To join a scheduled course meeting:

  1. Go to your class in Blackboard
  2. If your instructor has added a direct link to Zoom in the navigation menu, click there!
  3. If you don't see a specific Zoom link, click Tools
  4. Select Zoom Meetings and the course meetings listing will appear
  5. Click the Join button next to the desired meeting to enter the meeting.

If your instructor sent out a meeting invite via Outlook or posted it in your course, you can join the meeting right from the URL they posted too!

Signing In to Zoom

Signing In From A Web Browser


1)  Navigate to https://mcphs.zoom.us


     2)  Sign in to Zoom with your MCPHS UID/PW


or if needed

3)  Quick links to support, resources, and the Help Desk

Many features require the download and installation of the Zoom Meetings client.  You may download the client directly from the https://mcphs.zoom.us page.

Always ensure you are logging into your MCPHS-provided Zoom account (Steps Below). 

Setting Up Zoom In Your Blackboard Course

Adding a Zoom Meetings link to your course is easy:

Step 1: Linking Zoom to Blackboard

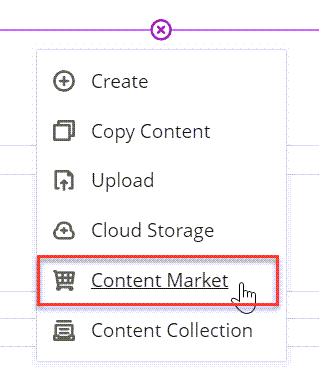
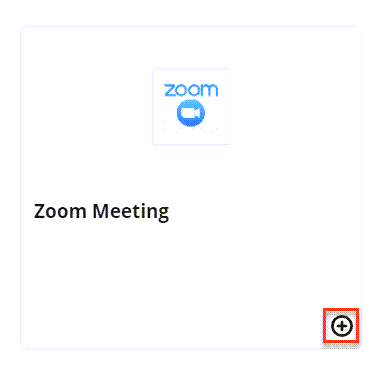
The first step to integrating Zoom is setting up the tool link in Blackboard.

  1. Open your Blackboard Learn Ultra course.
  2. Browse to the area in the course where you want the link to appear.
  3. Click the plus (+) sign to add content.
  4. Click Content Market.
    Click Content Market
  5. Click the plus sign next to Zoom Meeting.
    Click on the Plus sign for Zoom Meeting.
  6. Be sure to remember to make the tool visible.

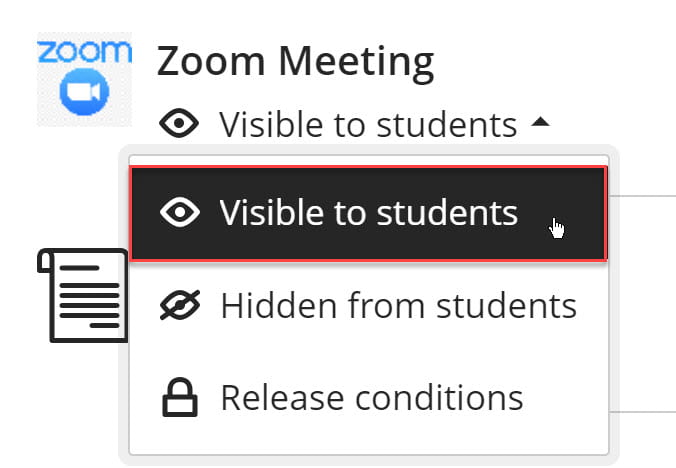
Note: You will not be able to test this link with Student Preview in Blackboard. As long as the link works with your instructor account and is not hidden, then your students will be able to see it.

You now have your link set up in your course!

As an instructor, you can schedule new meetings specifically for this course right within your course shell!

Zoom Meeting Security

Concerned about "Zoom Bombing"? Want to ensure you're setting up your meetings securely? Start here!


The Waiting Room feature is one of the best ways to protect your Zoom meeting space.

When you enable this feature, there's two options to manage the experience:

  1. All Participants will send everyone to a virtual waiting area and then you can admit them individually or all at once.
    • This is PERFECT for 1:1 consultations, or small group sessions where privacy is critical (advising sessions, etc.)
  2. Guest Participants Only allows authenticated users to bypass the waiting room but sends anyone attempting to join as a guest or not using their MCPHS credentials to the waiting room.

Explore this topic further!


Locking your meeting works just like closing your classroom door after the session starts.   You can give participants a few minutes to join and then simply lock the meeting to disallow late entrants.  

Learn all about managing your participants


Disable "Join Before Host".  Participants won't be able to join into the meeting space until you have arrived and are in place to view chat, etc.

They'll see a notice similar to:


As a host, you have a variety of important controls to help maintain the meeting environment for you and your participants.

Here's a quick overview:


It's important to get comfortable with the settings available to you; and recognize that some features are dependent on how you start your meeting.

Find out more via Zoom's Help Center

Additional Features & Tools

Before joining a Zoom meeting on a computer or mobile device, you can download the Zoom app from our Download Center. Otherwise, you will be prompted to download and install Zoom when you click a join link.

You can also join a test meeting to familiarize yourself with Zoom.

Prerequisites

  • Each meeting has a unique 9, 10, or 11-digit number called a meeting ID that will be required to join a Zoom meeting
  • If you are joining via telephone, you will need the teleconferencing number provided in the invite.

There are two ways to join meeting audio, joining via computer or joining via telephone. Follow these sections to test your audio before or after joining a meeting.

You can also join a test meeting if you want to test your audio and familiarize yourself with meeting controls.

Overview

Zoom offers multiple methods to schedule a meeting. A host has control over the options for their scheduled meetings except for settings that an administrator has locked for all users in the account or for all members of a specific group.

Host controls allow you as the host to control various aspects of the Zoom Meeting, such as managing the participants.

The co-host feature allows the host to share hosting privileges with another user, allowing the co-host to manage the administrative side of the meeting, such as managing participants or starting/stopping the recording. The host must assign a co-host. There is no limitation on the number of co-hosts you can have in a meeting or webinar.

Co-hosts do not have access to the following controls as they are only available as host controls in a meeting:

  • Start closed captioning and assign someone or a third-party to provide closed captioning
  • Start live streaming
  • End meeting for all participants
  • Make another participant a co-host
  • Start breakout rooms or move participants from one breakout room to another
  • Start waiting room (co-hosts can place participants in waiting room or admit/remove participants from the waiting room)

Co-hosts also cannot start a meeting. If a host needs someone else to be able to start the meeting, they can assign an alternative host

Prerequisites

  • Host permission in the meeting, or co-host permission (set by the host)
  • Zoom desktop client for Mac, PC, Chrome OS or Linux
  • Zoom mobile app for iOS or Android 

Overview

Breakout Rooms allow you to split your Zoom meeting in up to 50 separate sessions. The meeting host can choose to split the participants of the meeting into these separate sessions automatically or manually, and can switch between sessions at any time.

  • Up to 50 breakout rooms can be created
  • Max 200 total participants across all breakout rooms (requires Large Meeting 200 add-on)
  • Breakout room participants have full audio, video and screen share capabilities

If the meeting is being cloud recorded, it will only record the main room, regardless of what room the meeting host is in. If local recording is being used, it will record the room the participant who is recording is in. Multiple participants can record locally.

This article covers:

Learn how to manage breakout rooms.

Prerequisites

To manage breakout rooms as the host

  • Zoom account
  • Zoom desktop client
  •  

Note: Users joined into the Zoom meeting from the Zoom Desktop Client, Zoom Mobile App, or H.323/SIP devices can participate in breakout rooms. Users joined via the web client and Zoom Rooms are unable to join Breakout Rooms, but the main room can be used as an alternative session for these users.

Zoom allows for screen sharing on desktop, tablet and mobile devices running Zoom.

  • The host and attendee can screen share by clicking the Share Screen icon.
  • The host does not need to grant screen share access for another participant to share their screen.
  • The host can prevent participants from accessing screen share.

The polling feature for meetings allows you to create single choice or multiple choice polling questions for your meetings. You will be able to launch the poll during your meeting and gather the responses from your attendees. You also have the ability to download a report of polling after the meeting. Polls can also be conducted anonymously, if you do not wish to collect participant information with the poll results.

Generate Zoom Poll Reports

How to access and generate a meeting usage report

Notes: To generate and view a report, ensure that the following requirements are met:

  1. Sign in to the Zoom web portal.
  2. In the navigation menu, click Account Management then Reports.
  3. Click the Usage Reports tab.
  4. Click Meeting and webinar history.
    A list of upcoming and previous meetings will be generated. You can search by time range or by Meeting ID.
  5. (Optional) You can filter the results by selecting MeetingsWebinars, or both from the drop-down menu.
  6. In the From and To fields, choose the dates for the time range you want reports for.
  7. In the drop-down menu to the right of the meetings and webinars filter, choose the report type you want to search for:
    • Has any data
    • Has poll data
    • Has survey data
    • Has Q&A data
    • Has resource link data
    • Has reaction data
  8. Click Search.
  9. (Optional) In the last column after the Search button, click Export.
    Select the report you want to export as CSV file.
    • Export
    • Export the list with participants details
    • Export the list with features used
  10. In the last column of the meeting you want a report of, click the Generate detailed report icon.
    Select the report you want to generate.
    • Q&A Report
    • Resource Link Report
    • Attendee Report
    • Performance Report
  11. (Optional) After the report is finished generating, on the Report Queue tab, download the report as a CSV file or delete it from the queue.

How to generate a poll report during the meeting

  1. Start the scheduled Zoom meeting that has polling enabled.
  2. As the meeting host, launch the poll.
  3. Collect poll responses, then end the poll.
    The basic breakdown of poll results will be displayed. To see exactly who voted for each option, you will need to download the full report.
  4. Click the more  icon, then click Download results.
    Zoom will open your default web browser and begin the download.
    Note: You may have to sign in to your Zoom account first.
Connect with the MCPHS Libraries via Social Media: Instagram